

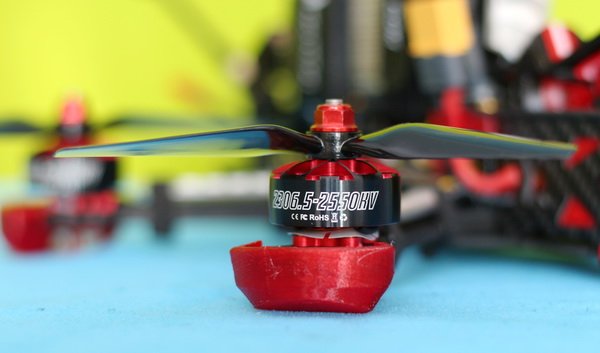
My HGLRC Sector 5 V3 review covers all my personal experiences from unboxing to first flight. Besides some facelift, the third generation Sector 5 brings upgraded hardware and GPS feature which provides failsafe RTH (Return To Home). Like its predecessors, the Sector 5 V3 also has two power options and multiple FPV setups. While 4S edition comes with HGLRC 2306.5 2550KV motors, the nimble 6S with 1900KV ones.
Analog version comes with a Caddx Ratel camera and Forward MT 5.8G VTX. Broadcast power can be toggled between 25, 100, 200, 400, and 800mW. HD digital edition has a DJI FPV camera and DJI AIR unit. Both variants can be ordered in a bundle with the following radio receivers: AC2000, FrSky R9MM-OTA, R-XSR, XM+, FlySky A8S V2, or Crossfire Nano RX.
For those who are interested in custom builds, the Sector 5 frame kit is also available in 6 and 7-inch versions. With a wheelbase of 296mm, Sector 7 is a damn huge freestyle drone. In the case of nasty crashes, individual frame parts are available as well.
HGLRC Sector 5 V3 GPS FPV drone in-depth review
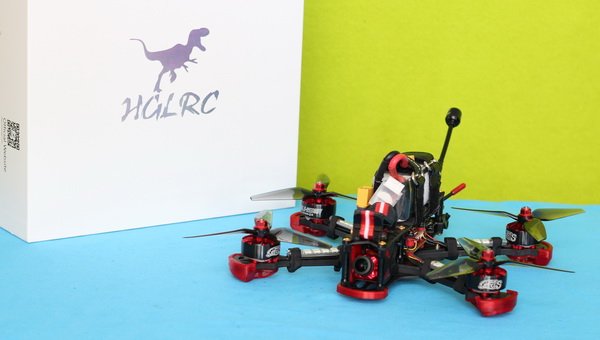
Disclosure: I received this GPS enabled 5″ FPV drone as part of a product review collaboration with HGLRC. Product specs and quality may vary according to the manufacturer’s reliability, so I cannot guarantee that you will get a kwad that performs exactly the same as seen in my article. For example, I read in another review that the LED lights came already installed.

At a glance
Sector 5 V3 comes fully build with the following accessories included: two sets of EthixS5 propellers, four W554A LED light boards with wires, a Hammer 5.8G antenna, and four battery straps (2 sizes). There is also included a bag of spare bolts. According to my requests, the FrSky RX was pre-installed and wired.
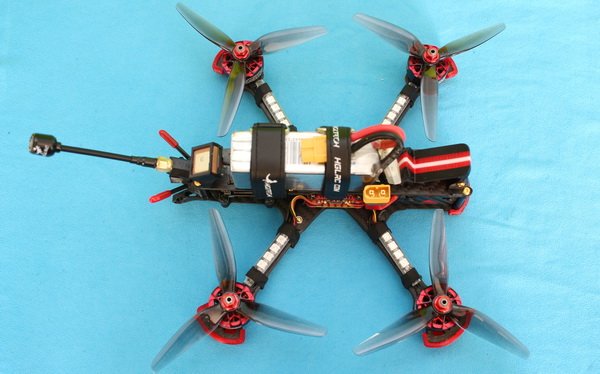
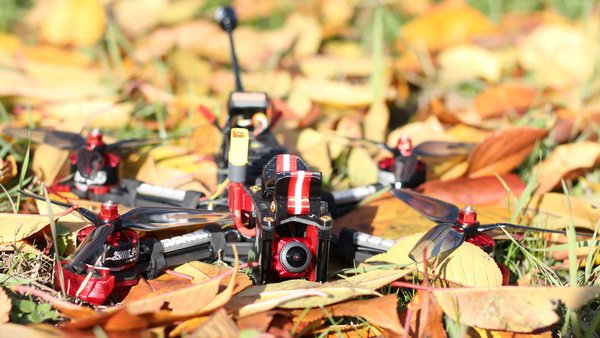
Holding in my hand feels very sturdy and well build. The red TPU parts together with gold bolts make the design very stylish. Wires all tidy and beautifully soldered. To be honest I was pleasantly impressed by their attention to every detail.
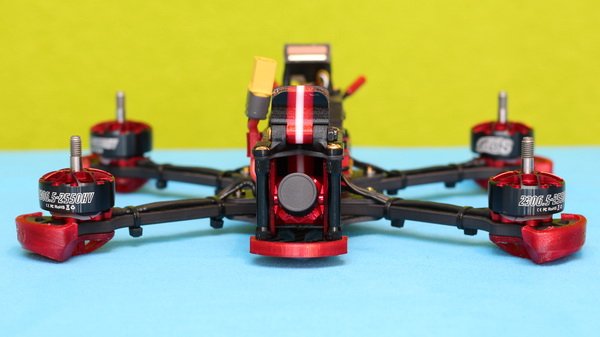
The 5mm arms are in a sandwich of 2mm plates. Inside there is room for two 30x30mm stacks. In the middle are the soft mounted Zeus F722 Flight Controller and the Forward 60A BL32 3-6S 4in1 ESC board. On the tail is the 5.8G MT VTX 800MW with the FrSky radio receiver zip-tied above (F/S button accessible right under the GPS antenna). The multipurpose TPU antenna holder can accommodate two VTX antennas (suitable for DJI Air Unit), and four radio receiver antennas (2xV and 2xT for TBS Crossfire). The XT60 power cable has a genius 3D printed mount which keeps nicely in place. Motors and the front of the drone are protected during crashes by TPU bumpers.
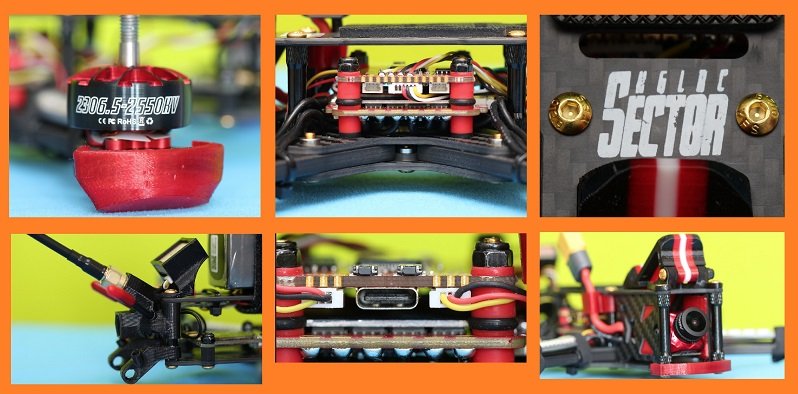
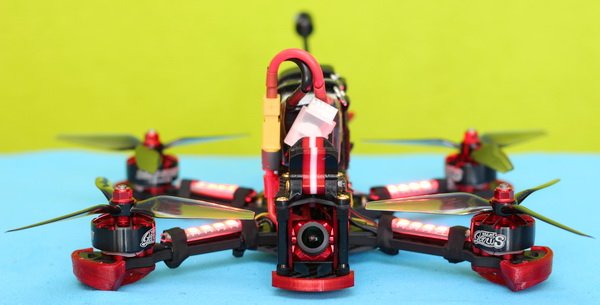
The top plate has a thickness of 2mm and it comes with a preinstalled anti-slip padding for the battery. Out of the box, it comes with a universal camera mount installed. The angle of the camera can be set in 5 positions (25°, 30°, 35°, and 40°).
Analog FPV rig (Camera and VTX)
As I previously mentioned, the analog HGLRC Sector 5V3 comes with Caddx Ratel camera and Forward MT 5.8G VTX. Right now the Caddx Ratel is considered one of the favorite FPV cameras for night flights due to its good low light sensitivity (Starlight rating). The camera is mounted between two TPU sheets which should provide some vibration reduction. IMHO the 2.1mm lens is quite exposed during a front collision, but probably this is the cost of a clean FPV view (no visible frame parts or props).

In addition to the onboard camera, you can install a second DVR camera for 4K recording. The mount can accommodate a wide range of action cameras (GoPro Hero/Session, Osmo Action, RunCam 5, or Foxeer box 2).
Channels, Bands, and transmission power can be changed from the VTX’s button or remotely via IRC Tramp protocol. The Forward MT 5.8G VTX has an onboard microphone which makes your FPV flights truly immersive. At the highest power rate (800mW) should give a few miles of FPV range with the correctly matched 5.8G antennas.
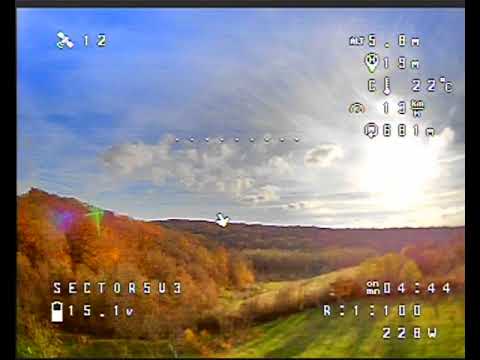
OSD is super detailed, and I had for the first time GPS information too. In addition to the usual stuff (aircraft name, flight mode, battery level, virtual horizon, warnings, etc) you will know your current flight altitude, distance, and even GPS speed. The number of satellites found is also displayed on your FPV goggles.

Price and availability
As previously mentioned, the Sector 5 V3 has two power and two FPV versions. All variants can be ordered from the manufacturer’s website. The analog version seen in this review is priced for $249.99 and the HD digital for $399.99. These prices include camera mounts, four pieces of LED boards, and one set of spare propellers. Whatever you opt for 4S or 6S, the price will be the same.
HGLRC Sector 5 V3 initial setup and GPS failsafe configuration
Before your first flight, you need to do some configurations and safety settings. The most important thing is: DO NOT INSTALL PROPS till everything is set correctly in the BetaFlight configurator. Installing the VTX antenna is also very important when you connect the battery!

I started the setting process by pairing my Taranis Q X7 remote controller with the Sector 5 V3. After I created a new aircraft profile on my transmitter and set it to ‘D16’, I activated binding mode and powered ON the drone while I pressed and hold the receiver’s F/S button. Successful binding is confirmed by a solid green light. Note binging steps may vary according to the receiver and transmitter you have.
The second step is to connect the flight controller to your computer using a USB type C cable (not included with the drone). Just in case, before any changes, I created a backup of the stock settings. This can be done by running the ‘dump’ command in CLI and then export it into a text file.

Betaflight Sector 5 V3 settings
After putting the aircraft on a flat surface, you can run accelerometer calibration. Under the ‘Ports’ tab, you should find the following settings: UART1 > serial RX, UART2 > GPS (115200 bitrates), UART3 > VTX (IRC Tramp), UART4 > Disabled, and UART 5 > ESC.
In the ‘Configuration’ tab you need to be sure that Accelerometer, Barometer, OSD, Anty_Gravity, Dynamic_Filter, and GPS sensors are turned ON. There is no physical buzzer, but you can make beeps through DShot Beacon. I suggest you enable all beepers.
GPS rescue mode can be customized and activated under the Failsafe tab (visible only in Advanced mode!). In case you are flying in a poor-satellite coverage zone, I suggest you change ‘minimal satellites’ from 8 to 6. Here is a crucial switch ‘Allow arming without fix‘. Without enabling this feature, you can arm and take-off only after the home point is locked. In case you are indoor in a parking garage, you will need to activate this option.
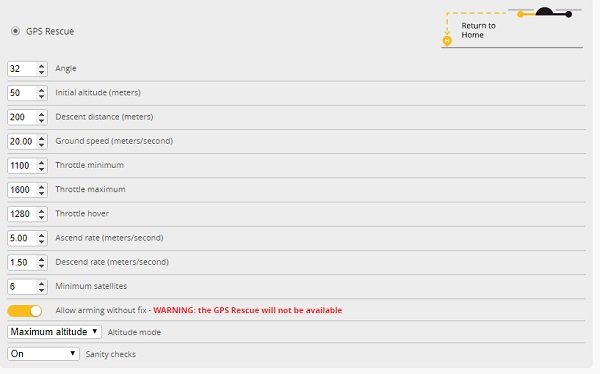
Finally, you need to configure your preferred switch assignment in the ‘mode’ tab. You will find a new option called ‘GPS Rescue’ which manually activates auto return to home. Note: If ‘Sanity checks‘ is ON, the drone will instantly drop when the Sector 5 V3 is in the proximity of the Home point and GPS failsafe occurs (manual or RC signal loss).
These are pretty much all the steps you need to do before your first hovering test. I recommend you change PID values only if you truly know what you are doing.
Preparing for the first flight
The most common mistake made by newbies is that they install the propellers in the wrong position. There are two types of blades, CW (ClockWise) and CCW (CounterClockWise) and they always need to be diagonal-paired (two by two). Most props have labels on top that look something like “5043” and “5043R”. When labeled like so, the “R” stands for CCW while the lack of an R means the prop is a CW one. The Ethix S5 propellers included with the Sector 5 V3 have simply an ‘R’ on CCW motors. Remember at the end to tight the prop nuts using a wrench key.
Now, using the included velcro bands, you can secure the battery to the top plate, make it tight but without damaging the lipo cell. For longer (bigger) battery packs, you can use two straps. In the same way, you can attach your GoPro to the camera mount. Removing (not just loosen!) the side bolts you can adjust the desired angle.
The color of the arm LEDs can be changed through the FC’s button. You can toggle between white, green, blue, yellow, purple, and red. By long-tapping the same button you can set various flashing and multi-color fading sequences. A pretty cool feature for those who like to pimp their drones.
Flight experience
With a 4S/1800Mah the HGLRC Sector5 V3 weighs about 650 grams. With this setup, I got an average of 6 minutes of flight time. Installing any full-size action camera or pocket gimbal will add another 100-150 grams to the total weight.
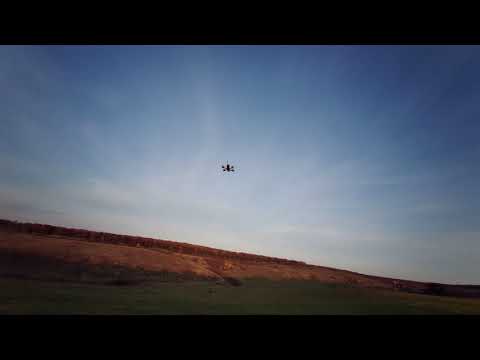
To be honest, I was mostly interested in testing the RTH feature, I was curious how it behaves on an FPV freestyle drone. For this, I made a few large circles around me, then flew in a straight line about 250 meters and triggered the RTH switch. As the drone was still in the line of sight (LoS), I saw that initial raised a bit (probably to the preset 50meters) and it started flying towards me. Next time, in order to simulate flying out if controllers range I will turn it off mid-flight and see what happens. You should know that there is no consumer drone with mm-accurate GPS, so you should not expect Sector 5 to return and land exactly on your landing pad.
Despite its generous weight, it has lots of power. You can’t even feel the extra weight of a full-size GoPro. I expect from 6S version to be even more nimble.
Editor’s ratings

What I liked
- Robust frame and excellent build quality;
- Easy maintenance, spare parts availability;
- GPS positioning and RTH;
- Excellent flight performance;
- Easy upgrading from analog to DJI digital FPV;
- TPU bumpers in front and motors;
- Included LED lights and camera mount;
- Free to download STL files for all TPU parts.
What I didn’t like
- LED lights can’t be configured individually or setting them as turning lights for Los flights;
- Not the lightest 5″ FPV drone (412g without battery and props);
- GPS locking takes some time (sometimes a few minutes);
- Exposed FPV camera lens.